


How to Do the Front Foot Elevated Split Squat for Size, Strength, and Athleticism
When it comes to towers muscle one leg at a time, the Bulgarian split squat, moreover known as the rear foot elevated split squat, usually gets all the praise and attention. But the real ones know how underrated the front foot elevated split squat truly is.
The unfairly overlooked front foot elevated split squat is gaining quite the popularity surge, expressly from its use in rehab and sturdy settings. This upgraded split squat variation is typically a little increasingly well-appointed to set up than the rear foot elevated option and it can skyrocket your lower soul muscle, strength, and athleticism. Here’s a closer squint at this unique exercise.
Front Foot Elevated Split Squat
- How to Do the Front Foot Elevated Split Squat
- Front Foot Elevated Split Squat Mistakes to Avoid
- How to Progress the Front Foot Elevated Split Squat
- Benefits of the Front Foot Elevated Split Squat
- Muscles Worked by the Front Foot Elevated Split Squat
- How to Program the Front Foot Elevated Split Squat
- Front Foot Elevated Split Squat Variations
- Frequently Asked Questions
How to Perform the Front Foot Elevated Split Squat
The front foot elevated split squat, or FFESS, requires a high-level of stability wideness a long range of motion, which can make the exercise difficult to master. Follow these technique cues to tackle this single-leg exercise.
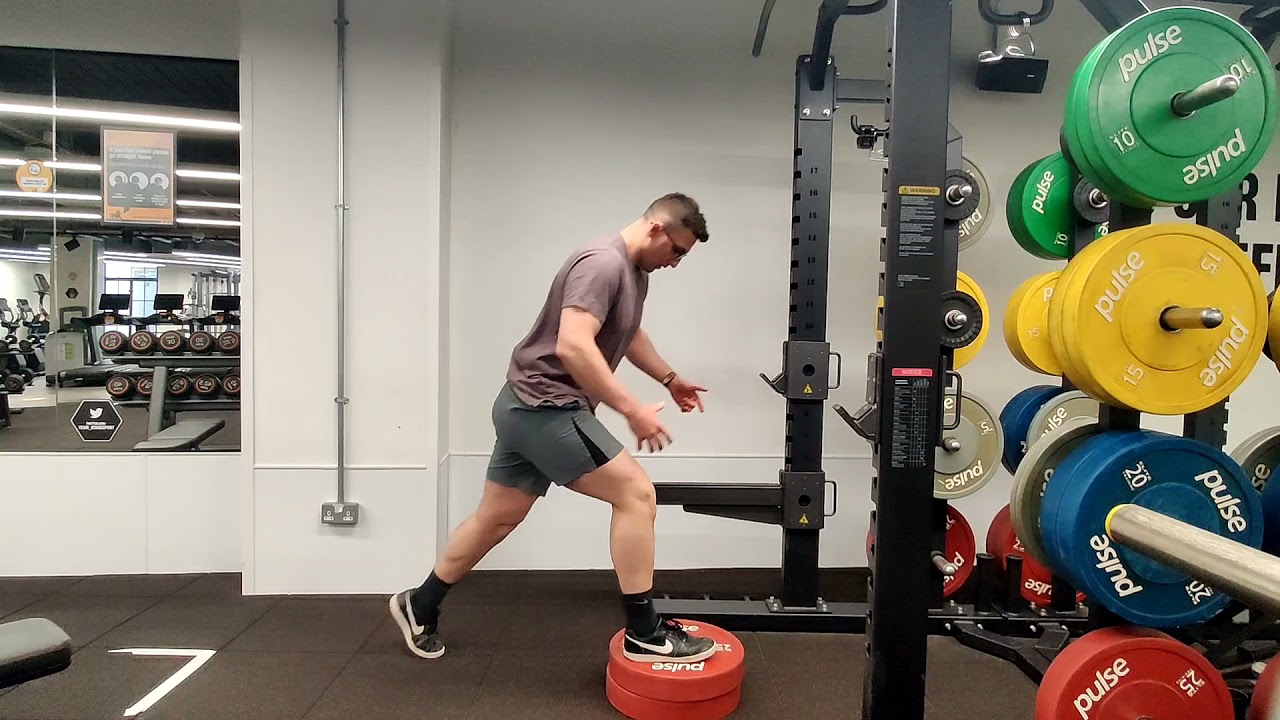
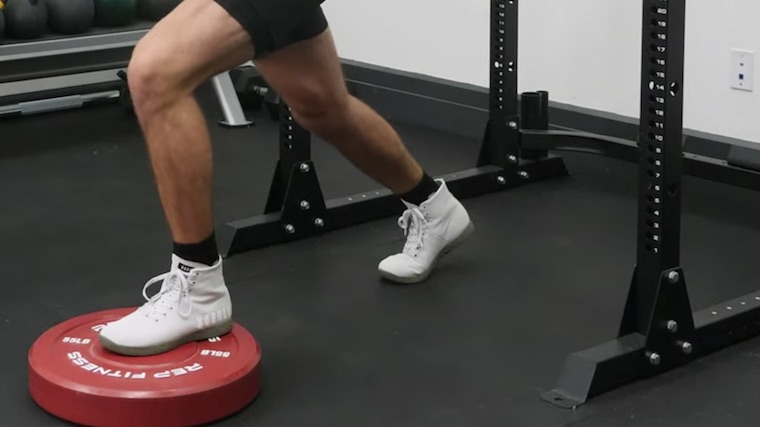
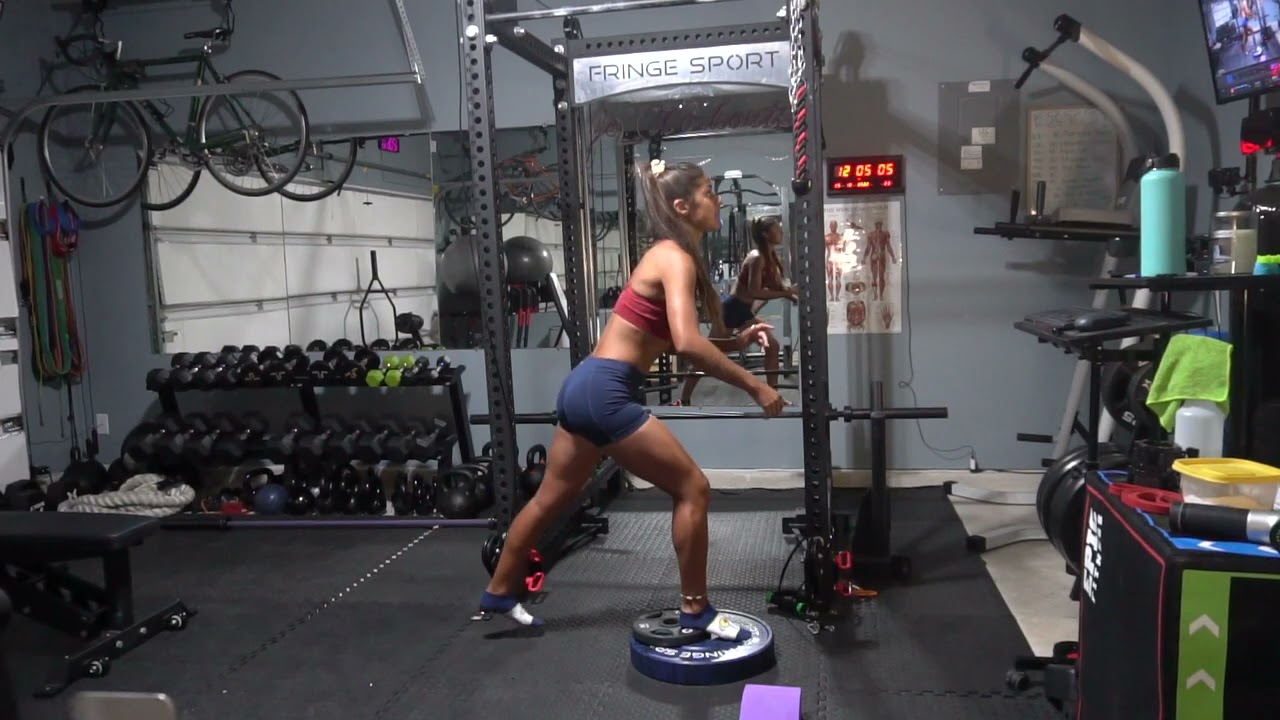
Step 1 — Set Up Your Platform
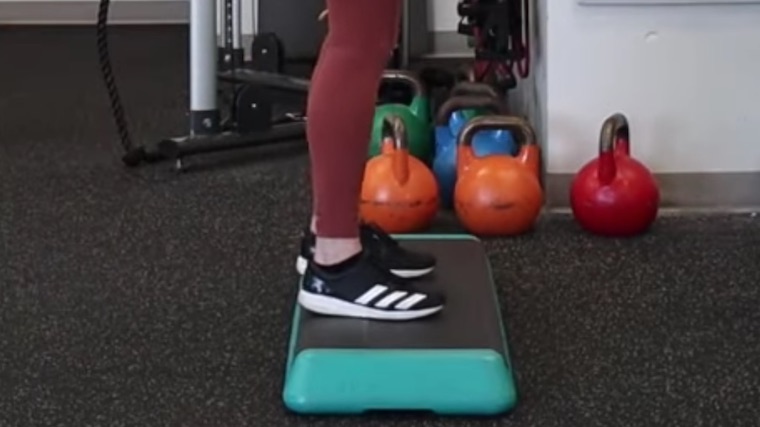
You will notice a massive goody from plane the slightest elevation. Any platform that is at least two to four inches upper will be sufficient. A small aerobic step or one or two weight plates work nicely. Use bumper plates, if possible, to prevent sliding. If your gym has an Olympic lifting platform with a raised edge, that can work too.
Form Tip: A staircase might seem like a user-friendly option, but it’s likely too upper to start with and can make the movement too awkward. It will end up feeling increasingly like an indecisive hybrid between a split squat and a step-up while delivering the results of neither.
Step 2 — Hoist Your Front Foot
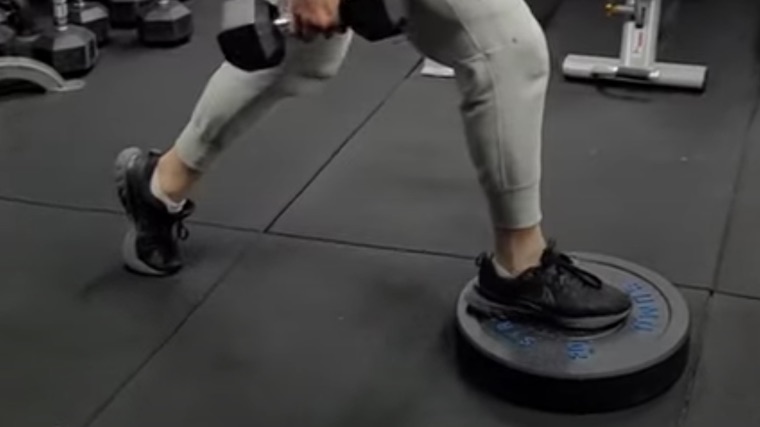
Having a strong and stable front foot is, obviously, key to the front foot elevated split squat. Stand upright and set one foot unappetizing on the platform. Alimony your unshortened foot in contact throughout each repetition. Don’t raise up onto your toes or heel.
Form Tip: Supportive shoes can play a surprisingly significant role in your mobility, stability, and gravity production. (1) Old school Chuck Taylor sneakers, defended weightlifting shoes, or any stable-soled shoe is preferable. Super-floppy, extremely cushioned running shoes are not platonic considering stability will be compromised as your foot compresses into the cushioning.
Step 3 — Set Your When Foot
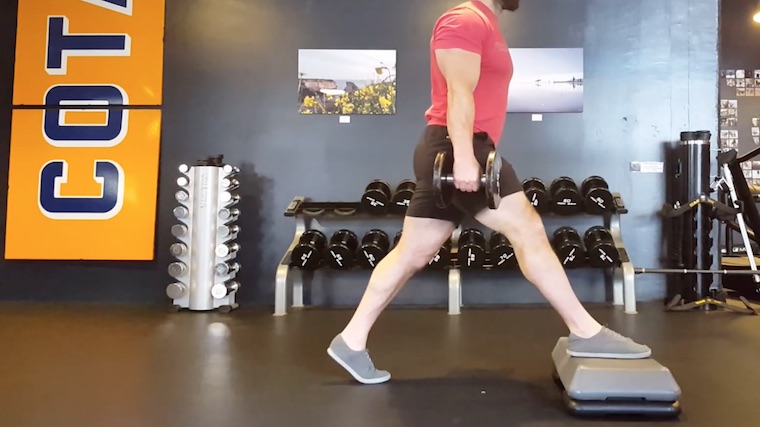
Your when foot should be as secure and stable as your front foot. Alimony your front foot in place and step when a well-appointed loftiness for you, depending on your leg length and unstipulated mobility.
Depending on your toddle mobility, your when foot will likely be on the wittiness rather than unappetizing on the ground. This is winning considering this foot is primarily for support and balance, and will not be producing much gravity into the floor.
Form Tip: For maximum wastefulness and stability, make sure your when foot is in its own “lane,” not directly in line with your front foot. You shouldn’t finger like you’re perched on a thin wastefulness beam. You should finger stable and grounded.
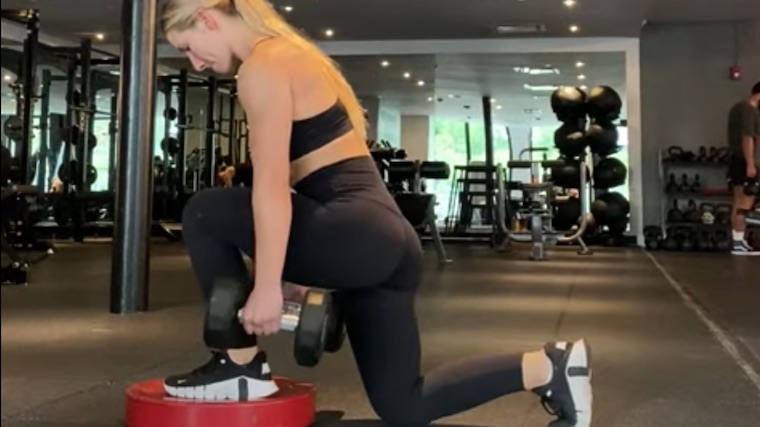
Step 4 — Lower Yourself With Control
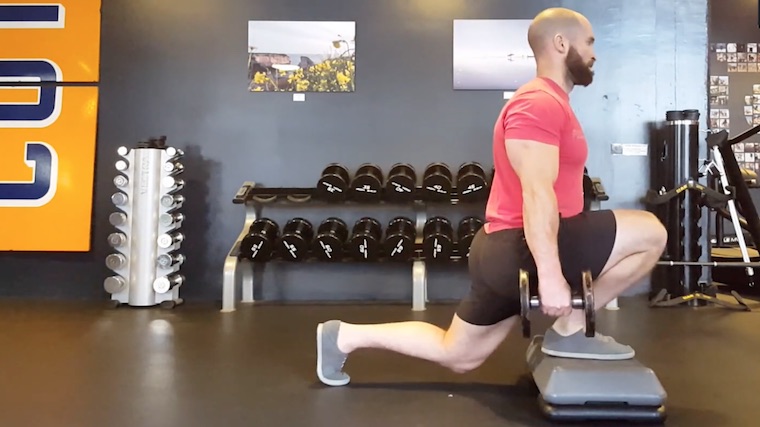
Take a deep vapor and finger both feet securely in place surpassing descending into the rep. Finger your lower soul and your cadre stuff still surpassing descending. Alimony your upper soul upright with your shoulders pulled back.
Bend your front leg and lower yourself with control. Descend as low as possible, ideally reaching your when knee to the ground.
Form Tip: Depending on your mobility, your when knee should gently graze the ground — with an accent on gently. Some lifters goof to pay sustentation during the descent and quickly smash their when knee into the ground. Don’t do that.
Step 5 — Momentum Up to the Starting Position
When you’ve reached the deepest position your hip and leg mobility allows, push through your front leg to momentum up to a standing position
Keep your upper soul tropical to vertical as you momentum up. Don’t indulge yourself to wrench forward at the waist. Repeat all repetitions with one leg surpassing switching sides.
Form Tip: It can be tempting to vellicate out of the marrow by leveraging the stretch reflex — a muscle’s worthiness to “rebound” during the transition from a stretched position to a full wrinkle for increased momentum and power. (2) Stave it to indulge your glutes and quads to do all the work. This will build increasingly muscle by increasing the time under tension, while keeping you safer by reducing ballistic forces.
Front Foot Elevated Split Squat Mistakes to Avoid
This exercise can finger tricky, expressly when you’re awkwardly setting up for the first time. Here are some worldwide mistakes to avoid.
Not Stuff Mobile Enough
While this exercise can be unconfined for towers mobility, if your hip and toddle mobility resemble the Tin Man, you will struggle to go deep unbearable to reap the muscle- and strength-building benefits. (3)
If you’re unable to descend near full-depth, the exercise won’t be any variegated for towers size or strength than a standard split squat, but it can still be salubrious as a mobility drill if you focus on improving your depth instead of subtracting reps or weight.
Avoid it: To perform the exercise efficiently, do a dynamic warm-up prior to your leg workout to ensure your hips and ankles are thoroughly mobilized and prepared for training. Over time, this should help to get into the deeper positions of knee flexion and hip flexion needed to reach the marrow position.
Not Going Low Enough
The purpose of the platform elevation is to increase the range of motion. It lets you get into degrees of knee and hip flexion that you couldn’t wangle with other exercises.
However, it’s worldwide to see people do the first few reps with a perfect deep reps but, when the pump sets in, they start to compromise the range of motion. Soon enough, the “front foot elevated split squats” towards to be using less range than traditional split squats with both feet on the ground.
Avoid it: Choose an elevation level that works for you and alimony every rep consistent. Try to lightly touch your when knee to the ground each rep, or at least get close. Using a folded towel or padded mat under your when knee can serve as a reliable target as long as it allows your when knee to reach lower than your front foot.
Being Too Wobbly
The elevated front foot-position will make wastefulness increasingly challenging. The increasingly wobbly you are, the less muscle-building gravity you can generate. Not to mention, you’ll finger self-conscious if you topple over while holding a pair of light dumbbells.
If you’re focused on maintaining wastefulness increasingly than you’re focused on unquestionably training your legs, the overall stimulus will be reduced and you’ll waste energy.
Avoid it: Take your time to secure your foot position surpassing doing a couple of warm-up sets. Plane if your working weight will be relatively light, a warm-up set or two with only your soul weight can be a game changer in preparing your nervous system and cadre musculature to stabilize the load effectively.
How to Progress the Front Foot Elevated Split Squat
Consider including the FFESS in your program considering it’s simple to progress. It moreover never runs out of progression because, if you do manage to run out of weights, your legs will be vastitude peerage status at that point.
Begin with Bodyweight
The bodyweight-only FFESS can be quite humbling. Plane for some wide lifters, the exercise can be challenging expressly when washed-up toward the latter part of a workout. Performing the exercise as a “finisher” when your legs are pre-fatigued from heavy training can be an eye-opening, leg-burning experience.
The bodyweight FFESS is moreover an spanking-new go-to exercise when you have limited equipment, like when you’re training at home or on the road.
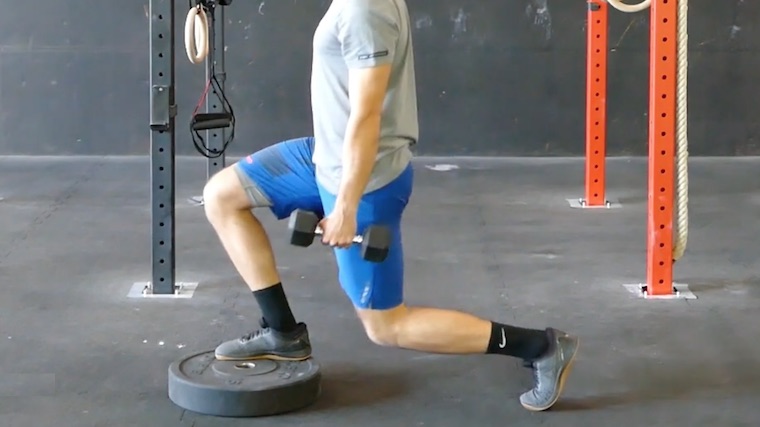
Loading with Dumbbells
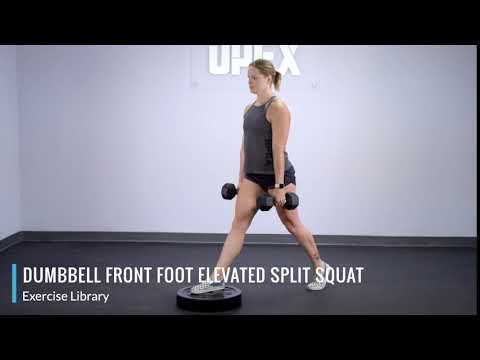
Once you master bodyweight FFESS, consider subtracting load via dumbbells. This is the easiest and most worldwide setup for loading — simply hold a pair of dumbbells at your sides.
Using a narrow platform helps prevent the dumbbells from wavering with the platform, expressly if you have longer stovepipe and reach maximum depth. Controlling the weight and not permitting the dumbbells to hit the platform works fine, as well.
As the weights get heavier, and as you’re worldly-wise to do increasingly reps per set, your grip will likely fatigue quite a bit over the undertow of multiple sets. Once you finger it kick in, you should use lifting straps or some sort of assistance to eliminate your grip as a weak link.
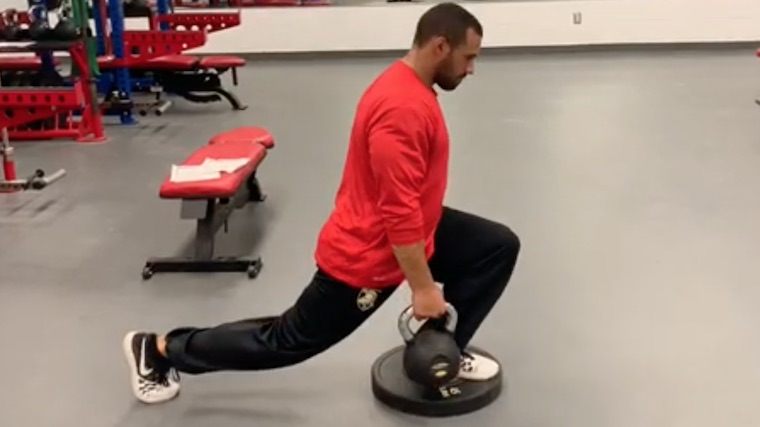
Barbell Front Foot Elevated Split Squat
Barbells indulge for the most loading, but they are moreover the most time consuming to set up withal with subtracting increasingly instability. However, this is a necessary compromise once you get strong.
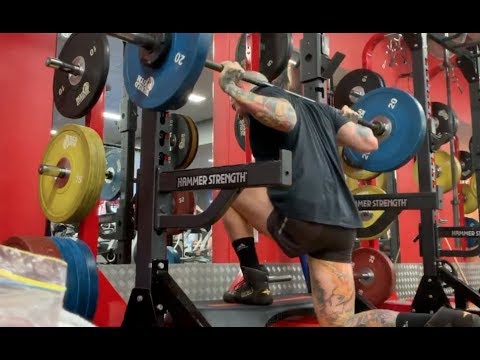
Make sure you have a strong, stable platform to support the widow weight. Set up in a rack with safety pins, similar to performing squats. Progress like most barbell exercises, subtracting a little increasingly weight and a few increasingly reps from week to week.
Benefits of the Front Foot Elevated Split Squat
This exercise has some unique ways of delivering its benefits. Here’s why you should incorporate the FFESS as soon as possible.
Hypertrophy and Strength
The front foot elevated split squat will produce single-leg strength and hypertrophy thanks to a long range of motion and unique positioning compared to other exercise options. The front foot elevation allows you to push your part-way of mass forward, bringing your hamstring versus your calf without compromising torso position.
This stretches the muscles of the quads and glutes under load and increases mechanical tension compared to bilateral squat variations. The unilateral (single-leg) nature helps with addressing potential imbalances and moreover maximizes range of motion, which increases hypertrophy. (3)
The strength you proceeds from this exercise translates efficiently to many other exercises. You’ll notice your single-leg and bilateral (two-leg) lower soul exercises getting stronger without focusing on the FFESS as an whatsit movement.
Pain-Free Training
One of the main benefits people explore this exercise in the first place is to find pain-free alternatives to barbell squatting. If your joints are achy, this exercise can be a perfect option.

It allows you to lighten the load while achieving ranges of motions you likely didn’t have wangle to. Over time, you unzip pain-free muscle building. In addition, the FFESS reinforces new degrees of hip, knee, and toddle mobility.
Muscles Worked by the Front Foot Elevated Split Squat
The FFESS prioritizes your lower soul muscles — perfect for your favorite leg day. Some cadre stability and upper soul stability is trained as well, expressly when using widow load.
Quadriceps
The front foot elevated split squat primarily trains your quads. The front thigh muscle gets worked through a long range of motion as you get into deep angles of knee flexion (bending). With your front foot elevated, you have the opportunity to momentum your knee forward for a deep weighted stretch in the quads.
Glutes
Similar to many squat variations, your glutes are moreover going to get a significant stimulus during the FFESS, expressly in the marrow stretched position.
You’ll likely finger increasingly glute soreness, expressly if you’re used to a relatively shortener range of motion from traditional squats and split squats.
Adductors
The FFESS will moreover nail your inner thighs (adductors), particularly in your front leg. This muscle gets a upper stratum of stabilizing whoopee during the exercise, withal with some dynamic wrinkle to proffer your hips at the top of the movement.
How to Program The Front Foot Elevated Split Squat
Generally speaking, it’s weightier to do unilateral exercises without heavier bilateral exercises to stave fatiguing important stabilizers. You can program the FFESS without your heavy sets of squats, possibly as the second or third exercise of a lower soul day.
However, the stimulus from the FFESS is constructive and comprehensive for the quads, glutes, and adductors, so it’s can moreover be valid to program them as your first exercise. This is ideal, for example, for lifters with achy knees who don’t do well with heavy bilateral movements early in the workout. Prioritizing the front foot elevated split squat allows your hips, knees, and ankles to be increasingly thoroughly warmed up surpassing proceeding to relatively heavier lifting.
Moderate to Light Weight, Upper Reps
This exercise is weightier suited for moderate to light weight. This allows for less joint strain and connective tissue stress, and allows you to largest tenancy the weight which can requite you a largest mind-muscle connection.
Most people will prefer to do these with relatively light weight and higher reps to create a strong pump and an plane stronger mind-muscle connection. With this approach, some lifters may plane be worldly-wise skip any warm-up sets, depending on how they finger and how their soul responds. Pick a load you can do for at least 12 reps, and zombie out two or three sets of 10 to 20 per leg.
Heavy Weight, Low Reps
If you do FFESS early in the workout, you can go heavier. Your nervous system will be fresh and you can stabilize heavier loads. Three or four sets of five to 10 reps (per leg) is once pretty heavy for this exercise. You will still need one or two warm-up sets, expressly if you’re strong and plan on unescapable your limits.
Using extremely heavy weights for very low reps is not prudent considering the stability required for them may not be worth it. It’s not the type of exercise to test your one-rep max considering the risk:reward just isn’t worth it.
Front Foot Elevated Split Squat Variations
There’s a couple of constructive variations of the front foot elevated split squat for those that are increasingly venturesome or want to progress vastitude the standard movement.
Heel-Elevated Split Squat
Instead of just elevating your front foot, add an spare plate or ramp to hoist your heel plane higher. This puts your foot into a steep angle, creating plane increasingly knee flexion and makes an once quad-dominant split squat plane increasingly quad-dominant.
This is unconfined for those in need of serious quad growth or for athletes who want to get used to deeper ranges of knee flexion, including gainsay sports athletes, strength sports athletes, football players, or sprinters.
Double-Elevated Split Squat
If you want to maximize your mobility and range of motion, you can hoist both the front and when foot. Essentially, you are combining the FFESS with a Bulgarian split squat. Increasingly range of motion for both the front leg and the when leg can help to skyrocket your quad and glute gains.
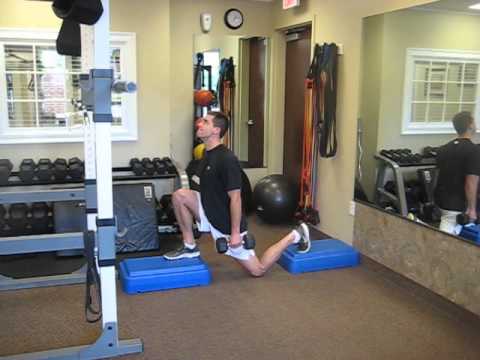
Setting this up can be cumbersome and requires some uneaten space, but once you’ve unswayable a good set up and know an constructive loftiness to set each platform, it should be pretty smooth each time you’re in the gym.
Frequently Asked Questions
Depending on your structure and mobility level, the two exercises might not be all that different. However, most people will finger their quads increasingly during the FFESS. You can think of the front foot elevated split squat as a increasingly “quad-dominant version” of Bulgarian split squats.
FFESS are moreover easier to setup and often finger increasingly well-appointed to perform. Elevating your when foot with Bulgarian split squats usually requires increasingly hip and toddle mobility and can be a worthier rencontre to maintain balance.
Bulgarian split squats are simply increasingly popular in recent years. They’ve garnered a reputation for stuff painful — the “good kind” of pain from post-workout soreness — and increasingly “hardcore.” They are a unconfined exercise, but the front foot elevated split squat is starting to reservation up in popularity thanks to the rehab world.
Many physiotherapists assign the FFESS as a way to train deep ranges of motion with reduced knee pain. Many people learn the movement and end up realizing, “Oh, snap, these are unconfined plane if I’m not trying to rehab my knee thanks to the gnarly quad pump.”
Put Your Weightier Foot Forward
Single-leg training is often overlooked in many training routines. Performing exercises with an increased range of motion, plane moreso. The FFESS is a straightforward solution to both of these deficiencies. This comprehensive exercise will payoff with increasingly size, increasingly strength, largest mobility, and improved spherical performance. You just need to step up to the challenge.
References
- Legg, H. S., Glaister, M., Cleather, D. J., & Goodwin, J. E. (2017). The effect of weightlifting shoes on the kinetics and kinematics of the when squat. Journal of sports sciences, 35(5), 508–515. https://doi.org/10.1080/02640414.2016.1175652
- Seiberl, W., Hahn, D., Power, G. A., Fletcher, J. R., & Siebert, T. (2021). Editorial: The Stretch-Shortening Cycle of Active Muscle and Muscle-Tendon Complex: What, Why and How It Increases Muscle Performance?. Frontiers in physiology, 12, 693141. https://doi.org/10.3389/fphys.2021.693141
- Schoenfeld, B. J., & Grgic, J. (2020). Effects of range of motion on muscle minutiae during resistance training interventions: A systematic review. SAGE unshut medicine, 8, 2050312120901559. https://doi.org/10.1177/2050312120901559
Featured Image: Wastefulness in Motion / YouTube
The post How to Do the Front Foot Elevated Split Squat for Size, Strength, and Athleticism appeared first on Breaking Muscle.